# MasterHttpRelayVPN-RUST
[](https://github.com/therealaleph/MasterHttpRelayVPN-RUST/releases/latest)
[](https://github.com/therealaleph/MasterHttpRelayVPN-RUST/releases)
[](https://github.com/therealaleph/MasterHttpRelayVPN-RUST/actions/workflows/release.yml)
[](LICENSE)
[](https://github.com/therealaleph/MasterHttpRelayVPN-RUST/stargazers)
[](https://sh1n.org/donate)
Rust port of [@masterking32's MasterHttpRelayVPN](https://github.com/masterking32/MasterHttpRelayVPN). **All credit for the original idea and the Python implementation goes to [@masterking32](https://github.com/masterking32).** This is a faithful reimplementation of the `apps_script` mode, packaged as two tiny binaries (CLI + desktop UI) with no runtime dependencies.
Free DPI bypass via Google Apps Script as a remote relay, with TLS SNI concealment. Your ISP's censor sees traffic going to `www.google.com`; behind the scenes a free Google Apps Script that you deploy in your own Google account fetches the real website for you.
> **Heads up on authorship:** the bulk of this Rust port was written with [Anthropic's Claude](https://claude.com) driving, reviewed by a human on every commit. Bug reports, fixes, and contributions are all welcome — see the [issues page](https://github.com/therealaleph/MasterHttpRelayVPN-RUST/issues).
**[Quick Start (English)](SF_README.md#quick-start)** | **[English Guide](#setup-guide)** | **[راهنمای خلاصه فارسی](SF_README.md#راهنمای-خلاصه-فارسی)** | **[راهنمای کامل فارسی](#راهنمای-فارسی)**
> **New here?** The Quick Start versions are short, plain-language, and cover the most common questions. The full guides have everything else (config options, full tunnel mode, OpenWRT, security notes).
## Why this exists
The original Python project is excellent but requires Python + `pip install cryptography h2` + system deps. For users in hostile networks that install process is often itself broken (blocked PyPI, missing wheels, Windows without Python). This port is a single ~2.5 MB executable that you download and run. Nothing else.
## How it works
```
Browser / Telegram / xray
|
| HTTP proxy (8085) or SOCKS5 (8086)
v
mhrv-rs (local)
|
| TLS to Google IP, SNI = www.google.com
v ^
DPI sees www.google.com |
| | Host: script.google.com (inside TLS)
v |
Google edge frontend ---------+
|
v
Apps Script relay (your free Google account)
|
v
Real destination
```
The censor's DPI sees `www.google.com` in the TLS SNI and lets it through. Google's frontend hosts both `www.google.com` and `script.google.com` on the same IP and routes by the HTTP `Host` header inside the encrypted stream.
For a handful of Google-owned domains (`google.com`, `youtube.com`, `fonts.googleapis.com`, …) the same tunnel is used directly instead of going through the Apps Script relay. This bypasses the per-fetch quota and fixes the "User-Agent is always `Google-Apps-Script`" problem for those domains. You can add more domains via the `hosts` map in config.
## Platforms
Linux (x86_64, aarch64), macOS (x86_64, aarch64), Windows (x86_64), **Android 7.0+** (universal APK covering arm64, armv7, x86_64, x86). Prebuilt binaries on the [releases page](https://github.com/therealaleph/MasterHttpRelayVPN-RUST/releases).
**Android users** — grab `mhrv-rs-android-universal-v*.apk` and follow the full walk-through in [docs/android.md](docs/android.md) (English) or [docs/android.fa.md](docs/android.fa.md) (فارسی). The Android build runs the exact same `mhrv-rs` crate as the desktop (via JNI) and adds a TUN bridge via `tun2proxy`, so every app on the device routes its IP traffic through the proxy without per-app configuration.
> **Important Android caveat (issues #74 / #81):** while TUN captures all IP traffic, _HTTPS_ traffic from third-party apps still only works for apps that trust user-installed CAs. From Android 7 onward (which covers all supported devices — `minSdk = 24`), apps must opt in via `networkSecurityConfig` to trust the MITM CA we install. **Chrome and Firefox do**; **Telegram, WhatsApp, Instagram, YouTube, banking apps, games** do not. For those apps, either use `PROXY_ONLY` mode and point their in-app proxy at `127.0.0.1:1081` (SOCKS5), use `google_only` mode (no CA required, Google services only), or set `upstream_socks5` to an external VPS. This is an Android security design, not a bug in this client — same limit applies to every other MITM proxy on the platform.
## What's in a release
Each archive contains two binaries and a launcher script:
| file | purpose |
|---|---|
| `mhrv-rs` / `mhrv-rs.exe` | CLI. Headless use, servers, automation. Works on all platforms; no system deps on macOS/Windows. |
| `mhrv-rs-ui` / `mhrv-rs-ui.exe` | Desktop UI (egui). Config form, Start/Stop/Test buttons, live stats, log panel. |
| `run.sh` / `run.command` / `run.bat` | Platform launcher: installs the MITM CA (needs sudo/admin) and then starts the UI. Use this on first run. |
macOS archives also ship `mhrv-rs.app` (in `*-app.zip`) — double-click to launch the UI without a terminal. You'll still need to run the CLI (`mhrv-rs --install-cert`) or `run.command` once to install the CA.

Linux UI also needs common desktop libraries available: `libxkbcommon`, `libwayland-client`, `libxcb`, `libgl`, `libx11`, `libgtk-3`. On most desktop distros these are already present; on a headless box install them via your package manager, or just use the CLI.
## Where things live
Config and the MITM CA live in the OS user-data dir:
- macOS: `~/Library/Application Support/mhrv-rs/`
- Linux: `~/.config/mhrv-rs/`
- Windows: `%APPDATA%\mhrv-rs\`
Inside that dir:
- `config.json` — your settings (written by the UI's **Save** button or hand-edited)
- `ca/ca.crt`, `ca/ca.key` — the MITM root certificate. Only you have the private key.
The CLI also falls back to `./config.json` in the current directory for backward compatibility with older setups.
## Setup Guide
### Step 1 — Deploy the Apps Script relay (one-time)
This part is unchanged from the original project. Follow @masterking32's guide or the summary below:
1. Open while signed into your Google account.
2. **New project**, delete the default code.
3. Copy the contents of [`Code.gs` from the original repo](https://github.com/masterking32/MasterHttpRelayVPN/blob/python_testing/apps_script/Code.gs) ([raw](https://raw.githubusercontent.com/masterking32/MasterHttpRelayVPN/refs/heads/python_testing/apps_script/Code.gs)) into the editor. If that URL is unreachable from your network, there's a mirrored copy in this repo at [`assets/apps_script/Code.gs`](assets/apps_script/Code.gs) — same file, pulled from upstream.
4. Change `const AUTH_KEY = "..."` to a strong secret only you know.
5. **Deploy → New deployment → Web app**.
- Execute as: **Me**
- Who has access: **Anyone**
6. Copy the **Deployment ID** (the long random string in the URL).
#### Can't reach `script.google.com` from your network?
If your ISP is already blocking Google Apps Script (or all of Google), you need Step 1's browser connection to succeed *before* you have a relay to use. `mhrv-rs` ships a `direct` mode for exactly this — SNI-rewrite tunnel only, no Apps Script relay required. (Was named `google_only` before v1.9 — the old name is still accepted in config files.)
1. Build / download the binary as in Step 2 below.
2. Copy [`config.direct.example.json`](config.direct.example.json) to `config.json` — no `script_id`, no `auth_key` required.
3. Run `mhrv-rs serve` and set your browser's HTTP proxy to `127.0.0.1:8085`.
4. In `direct` mode the proxy only routes `*.google.com`, `*.youtube.com`, and the other Google-edge hosts (plus any [`fronting_groups`](docs/fronting-groups.md) you've configured) via the SNI-rewrite tunnel. Other traffic goes raw — no Apps Script relay exists yet.
5. Do Step 1 in your browser (the connection to `script.google.com` will be SNI-fronted). Deploy Code.gs, copy the Deployment ID.
6. In the desktop UI or the Android app (or by editing `config.json`) switch the mode back to `apps_script`, paste the Deployment ID and your auth key, and restart.
You can also verify reachability before even starting the proxy: `mhrv-rs test-sni` probes `*.google.com` directly and works without any config beyond `google_ip` + `front_domain`.
### Step 2 — Download
Grab the archive for your platform from the [releases page](https://github.com/therealaleph/MasterHttpRelayVPN-RUST/releases) and extract it.
Or build from source:
```bash
cargo build --release --features ui
# Binaries: target/release/mhrv-rs and target/release/mhrv-rs-ui
```
### Step 3 — First run: install the MITM CA
To route your browser's HTTPS traffic through the Apps Script relay, `mhrv-rs` has to terminate TLS locally on your machine, forward the request through the relay, and re-encrypt the response with a certificate your browser trusts. That requires a small **local** Certificate Authority.
**What actually happens on first run:**
- A fresh CA keypair (`ca/ca.crt` + `ca/ca.key`) is generated **on your machine**, in your user-data dir.
- The public `ca.crt` is added to your system trust store so browsers accept the per-site certificates `mhrv-rs` mints on the fly. This is the step that needs sudo / Administrator.
- The private `ca.key` **never leaves your machine**. Nothing uploads it, nothing phones home, and no remote party — including the Apps Script relay — can use it to impersonate sites to you.
- You can revoke it at any time with `mhrv-rs --remove-cert` (or the **Remove CA** button in the UI) — it clears the CA from the OS trust store, verifies the revocation by name before touching disk, and deletes the on-disk `ca/` folder. NSS cleanup (Firefox profiles + Chrome/Chromium on Linux) is best-effort: if `certutil` from libnss3-tools isn't on PATH or a browser has the NSS DB locked, the tool logs a manual-cleanup hint. `config.json` and your Apps Script deployment are not touched, so regenerating the CA never requires redeploying `Code.gs`. Manual fallback: the certificate's Common Name is `MasterHttpRelayVPN` (not `mhrv-rs` — that's the app name, not the cert name). Delete by that CN in your OS keychain (macOS: Keychain Access → System → delete `MasterHttpRelayVPN`), Windows `certmgr.msc` → Trusted Root Certification Authorities, or `/usr/local/share/ca-certificates/MasterHttpRelayVPN.crt` + `sudo update-ca-certificates` on Linux; remove the `MasterHttpRelayVPN` entry from each browser's cert settings; and remove the `ca/` folder under the user-data dir.
The launcher does all of this for you and then starts the UI:
| platform | how |
|---|---|
| macOS | double-click `run.command` in Finder (or `./run.command` in a terminal) |
| Linux | `./run.sh` from a terminal |
| Windows | double-click `run.bat` |
It will ask for your password (sudo / UAC) **only** to trust the CA. After that the launcher also starts `mhrv-rs-ui`. On later runs you don't need the launcher — the CA is already trusted, so you can open `mhrv-rs.app` / `mhrv-rs-ui.exe` / `mhrv-rs-ui` directly.
If you prefer to do the CA step by hand:
```bash
# Linux / macOS
sudo ./mhrv-rs --install-cert
# Windows (Administrator)
mhrv-rs.exe --install-cert
```
Firefox keeps its own cert store; the installer also drops the CA into Firefox's NSS database via `certutil` (best-effort). If Firefox still complains, import `ca/ca.crt` manually via Settings → Privacy & Security → Certificates → View Certificates → Authorities → Import.
### Step 4 — Configure in the UI
Open the UI and fill in the form:
- **Apps Script ID** — the Deployment ID from Step 1. Add multiple IDs (one per line in the UI, or a JSON array in `config.json`) for higher quota **and** lower latency. In `apps_script` mode, IDs are round-robined. In `full` mode, each deployment gets its own pool of 30 concurrent requests (the Apps Script per-account limit), so more IDs = more total throughput (see [Full tunnel mode](#full-tunnel-mode) below).
- **Auth key** — the same secret you set in `Code.gs`.
- **Google IP** — `216.239.38.120` is a solid default. Use the **scan** button to probe for a faster one from your network.
- **Front domain** — keep `www.google.com`.
- **HTTP port** / **SOCKS5 port** — defaults `8085` / `8086`.
Hit **Save**, then **Start**. Use **Test** any time to send one request end-to-end through the relay and report the result.
### Step 4 (alternative) — CLI only
Everything the UI does is also available in the CLI. Copy `config.example.json` to `config.json` (either next to the binary or into the user-data dir shown above), fill it in:
```json
{
"mode": "apps_script",
"google_ip": "216.239.38.120",
"front_domain": "www.google.com",
"script_id": "PASTE_YOUR_DEPLOYMENT_ID_HERE",
"auth_key": "same-secret-as-in-code-gs",
"listen_host": "127.0.0.1",
"listen_port": 8085,
"socks5_port": 8086,
"log_level": "info",
"verify_ssl": true
}
```
Then:
```bash
./mhrv-rs # serve (default)
./mhrv-rs test # one-shot end-to-end probe
./mhrv-rs scan-ips # rank Google frontend IPs by latency
./mhrv-rs --install-cert # reinstall the MITM CA
./mhrv-rs --remove-cert # clean slate: uninstall + delete the whole ca/ dir
./mhrv-rs --help
```
`--remove-cert` deletes the CA from the OS trust store, deletes the on-disk `ca/` directory, and verifies the revocation by name — if a system-level delete needed admin you didn't have, it aborts the file deletion and prints an error so you can re-run elevated. NSS cleanup (Firefox profiles + Chrome/Chromium on Linux) is best-effort: if `certutil` isn't on PATH or a browser holds the NSS DB open, the tool logs a manual-cleanup hint. Your `config.json` and the Apps Script deployment at `script.google.com` are untouched, so a fresh CA (generated next time you start the proxy) does not require redeploying `Code.gs`.
> **Upgrading from pre-v1.2.11?** Earlier versions wrote a bare `user_pref("security.enterprise_roots.enabled", true);` into each Firefox profile's `user.js` without a provenance marker. `--remove-cert` intentionally does **not** strip that line — a bare pref is indistinguishable from one authored by the user or a corporate policy, and silently revoking trust behavior is worse than leaving one cosmetic orphan line. Firefox falls back to its built-in Mozilla root store the moment the MITM CA leaves the OS trust store, so this has no functional effect. Delete the line manually if it bothers you.
`script_id` can also be a JSON array: `["id1", "id2", "id3"]`.
#### scan-ips configuration (optional)
By default, the scan-ips subcommand uses a static array of IPs.
You can enable dynamic IP discovery by setting fetch_ips_from_api to true in config.json:
```json
{
"fetch_ips_from_api": true,
"max_ips_to_scan": 100,
"scan_batch_size":100,
"google_ip_validation": true // check whether ips belongs to frontend sites of google or not
}
```
When enabled:
- Fetches goog.json from Google’s public IP ranges API
- Extracts all CIDRs and expands them to individual IPs
- Prioritizes IPs from famous Google domains (google.com, youtube.com, etc.)
- Randomly selects up to max_ips_to_scan candidates (prioritized IPs first)
- Tests only the selected candidates for connectivity and frontend validation.
By using this options you may find ips witch are faster than static array that is provided as default but there is no guarantee that this ips would work.
### Step 5 — Point your client at the proxy
The tool listens on **two** ports. Use whichever your client supports:
**HTTP proxy** (browsers, generic HTTP clients) — `127.0.0.1:8085`
- **Firefox** — Settings → Network Settings → **Manual proxy**. HTTP host `127.0.0.1`, port `8085`, tick **Also use this proxy for HTTPS**.
- **Chrome / Edge** — use the system proxy settings, or the **Proxy SwitchyOmega** extension.
- **macOS system-wide** — System Settings → Network → Wi-Fi → Details → Proxies → enable **Web Proxy (HTTP)** and **Secure Web Proxy (HTTPS)**, both `127.0.0.1:8085`.
- **Windows system-wide** — Settings → Network & Internet → Proxy → **Manual proxy setup**, address `127.0.0.1`, port `8085`.
**SOCKS5 proxy** (Telegram, xray, app-level clients) — `127.0.0.1:8086`, no auth.
- Works for HTTP, HTTPS, **and** non-HTTP protocols (Telegram's MTProto, raw TCP). The server auto-detects each connection: HTTP/HTTPS go through the Apps Script relay, SNI-rewritable domains go through the direct Google-edge tunnel, and anything else falls through to raw TCP.
## Telegram, IMAP, SSH — pair with xray (optional)
The Apps Script relay only speaks HTTP request/response, so non-HTTP protocols (Telegram MTProto, IMAP, SSH, arbitrary raw TCP) can't travel through it. Without anything else, those flows hit the direct-TCP fallback — which means they're not actually tunneled, and an ISP that blocks Telegram will still block them.
Fix: run a local [xray](https://github.com/XTLS/Xray-core) (or v2ray / sing-box) with a VLESS/Trojan/Shadowsocks outbound that goes to a VPS of your own, and point mhrv-rs at xray's SOCKS5 inbound via the **Upstream SOCKS5** field (or the `upstream_socks5` config key). When set, raw-TCP flows coming through mhrv-rs's SOCKS5 listener get chained into xray → the real tunnel, instead of connecting directly.
```
Telegram ┐ ┌─ Apps Script ── HTTP/HTTPS
├─ SOCKS5 :8086 ─┤ mhrv-rs ├─ SNI rewrite ─── google.com, youtube.com, …
Browser ┘ └─ upstream SOCKS5 ─ xray ── VLESS ── your VPS (Telegram, IMAP, SSH, raw TCP)
```
Example config fragment (both UI and JSON):
```json
{
"upstream_socks5": "127.0.0.1:50529"
}
```
HTTP/HTTPS continues to route through the Apps Script relay (no change), and the SNI-rewrite tunnel for `google.com` / `youtube.com` / etc. keeps bypassing both — so YouTube stays as fast as before while Telegram gets a real tunnel.
## Full tunnel mode
Full tunnel mode (`"mode": "full"`) routes **all** traffic end-to-end through Apps Script and a remote [tunnel-node](tunnel-node/) — no MITM certificate needed. TCP is carried as persistent tunnel sessions, and UDP from Android/TUN clients is carried via SOCKS5 `UDP ASSOCIATE` to the tunnel-node, which then emits real UDP from the server side. The trade-off is higher latency per request (every byte/datagram goes Apps Script → tunnel-node → destination), but it works for protocols and apps that cannot use the MITM relay path.
### How deployment IDs affect performance
Each Apps Script batch request takes ~2 seconds round-trip. In full mode, `mhrv-rs` runs a **pipelined batch multiplexer** that fires multiple batch requests concurrently without waiting for the previous one to return. Each deployment ID (= one Google account) gets its own concurrency pool of **30 in-flight requests** — matching the Apps Script per-account execution limit.
```
max_concurrent = 30 × number_of_deployment_ids
```
| Deployments | Concurrent requests | Notes |
|-------------|-------------------|-------|
| 1 | 30 | Single account — plenty for light browsing |
| 3 | 90 | Good for daily use |
| 6 | 180 | Recommended for heavy use |
| 12 | 360 | Multi-account power setup |
More deployments = more total concurrency = lower per-session latency. Each batch round-robins across your deployment IDs, so the load is spread evenly and you're less likely to hit a single deployment's quota ceiling.
**Resource guards** keep things safe:
- **50 ops max** per batch — if more sessions are active, the mux splits into multiple batches
- **4 MB payload cap** per batch — well under Apps Script's 50 MB limit
- **30 s timeout** per batch — a slow/dead target can't block other sessions forever
### Quick start
1. Deploy [`CodeFull.gs`](assets/apps_script/CodeFull.gs) as a **Web App deployment** on each Google account (same steps as `Code.gs`, but use the full-mode script that forwards to your tunnel-node). Use **one deployment per Google account** — the 30-concurrent-request limit is per account, so multiple deployments on the same account share the same pool and don't add concurrency. To scale, add more accounts:
- **Solo use** → 1–2 accounts is plenty
- **Shared with ~3 people** → 3 accounts
- **Shared with a group** → one account per heavy user
2. Deploy the [tunnel-node](tunnel-node/) on a VPS. The fastest path is the prebuilt Docker image:
```bash
docker run -d --name mhrv-tunnel --restart unless-stopped \
-p 8080:8080 -e TUNNEL_AUTH_KEY=your-strong-secret \
ghcr.io/therealaleph/mhrv-tunnel-node:latest
```
Multi-arch (linux/amd64 + linux/arm64), runs as a non-root user, ~32 MB compressed. Pin a version tag (`:1.5.0`) for production. See [tunnel-node/README.md](tunnel-node/README.md) for Cloud Run, docker-compose, and source-build alternatives.
3. Set `"mode": "full"` in your config with all deployment IDs:
```json
{
"mode": "full",
"script_id": ["id1", "id2", "id3", "id4", "id5", "id6"],
"auth_key": "your-secret"
}
```
## Sharing via hotspot (Android → iOS / laptop)
The proxy listens on `0.0.0.0` by default, so any device on the same network can use it. This lets you share the tunnel from an Android phone to an iPhone, iPad, or laptop over hotspot:
1. **Android**: enable mobile hotspot + start the app
2. **Other device**: connect to the Android hotspot WiFi
3. **Configure proxy** on the other device:
- **Server**: `192.168.43.1` (Android's default hotspot IP)
- **Port**: `8080` (HTTP) or `1081` (SOCKS5)
### iOS setup
Settings → WiFi → tap (i) on the hotspot network → Configure Proxy → Manual → Server `192.168.43.1`, Port `8080`.
For full device-wide coverage on iOS, use an app like [Shadowrocket](https://apps.apple.com/app/shadowrocket/id932747118) or [Potatso](https://apps.apple.com/app/potatso/id1239860606) — point it at the SOCKS5 proxy (`192.168.43.1:1081`) and it will route all traffic through the tunnel.
### macOS / Windows
Set the system HTTP proxy to `192.168.43.1:8080` in network settings, or configure per-app SOCKS5 proxy to `192.168.43.1:1081`.
> **Note**: if `listen_host` is set to `127.0.0.1` in your config, change it to `0.0.0.0` to allow connections from other devices.
## Running on OpenWRT (or any musl distro)
The `*-linux-musl-*` archives ship a fully static CLI that runs on OpenWRT, Alpine, and any libc-less Linux userland. Put the binary on the router and start it as a service:
```sh
# From a machine that can reach your router:
scp mhrv-rs root@192.168.1.1:/usr/bin/mhrv-rs
scp mhrv-rs.init root@192.168.1.1:/etc/init.d/mhrv-rs
scp config.json root@192.168.1.1:/etc/mhrv-rs/config.json
# On the router:
chmod +x /usr/bin/mhrv-rs /etc/init.d/mhrv-rs
/etc/init.d/mhrv-rs enable
/etc/init.d/mhrv-rs start
logread -e mhrv-rs -f # tail its logs
```
LAN devices then point their HTTP proxy at the router's LAN IP (default port `8085`) or their SOCKS5 at `:8086`. Set `listen_host` to `0.0.0.0` in `/etc/mhrv-rs/config.json` so the router accepts LAN connections instead of localhost-only.
Memory footprint is ~15-20 MB resident — fine on anything with ≥128 MB RAM. No UI is shipped for musl (routers are headless).
## Diagnostics
- **`mhrv-rs test`** — sends one request through the relay and reports success/latency. Use this first whenever something breaks — it isolates "relay is up" from "client config is wrong".
- **`mhrv-rs scan-ips`** — parallel TLS probe of 28 known Google frontend IPs, sorted by latency. Take the winner and put it in `google_ip`. The UI has the same thing behind the **scan** button next to the Google IP field.
- **`mhrv-rs test-sni`** — parallel TLS probe of every SNI name in your rotation pool against the configured `google_ip`. Tells you which front-domain names actually pass through your ISP's DPI. The UI has the same thing in the **SNI pool…** floating window, with checkboxes, per-row **Test** buttons, and a **Keep ✓ only** button that auto-trims to what worked.
- **Periodic stats** are logged every 60 s at `info` level (relay calls, cache hit rate, bytes relayed, active vs. blacklisted scripts). The UI shows them live.
### SNI pool editor
By default `mhrv-rs` rotates through `{www, mail, drive, docs, calendar}.google.com` on outbound TLS connections to your Google IP, to avoid fingerprinting one name too heavily. Some of those may be locally blocked — e.g. `mail.google.com` has been specifically targeted in Iran at various times.
Either:
- Open the UI, click **SNI pool…**, hit **Test all**, then **Keep ✓ only** to auto-trim. Add custom names via the text field at the bottom. Save.
- Or edit `config.json` directly:
```json
{
"sni_hosts": ["www.google.com", "drive.google.com", "docs.google.com"]
}
```
Leaving `sni_hosts` unset gives you the default auto-pool. Run `mhrv-rs test-sni` to verify what works from your network before saving.
## What's implemented vs. not
This port focuses on the **`apps_script` mode** — the only one that reliably works against a modern censor in 2026. Implemented:
- [x] Local HTTP proxy (CONNECT for HTTPS, plain forwarding for HTTP)
- [x] Local SOCKS5 proxy with smart TLS/HTTP/raw-TCP dispatch (Telegram, xray, etc.)
- [x] MITM with on-the-fly per-domain cert generation via `rcgen`
- [x] CA generation + auto-install on macOS / Linux / Windows
- [x] Firefox NSS cert install (best-effort via `certutil`)
- [x] Apps Script JSON relay, protocol-compatible with `Code.gs`
- [x] Connection pooling (45 s TTL, max 20 idle)
- [x] Gzip response decoding
- [x] Multi-script round-robin
- [x] Auto-blacklist failing scripts on 429 / quota errors (10-minute cooldown)
- [x] Response cache (50 MB, FIFO + TTL, `Cache-Control: max-age` aware, heuristics for static assets)
- [x] Request coalescing: concurrent identical GETs share one upstream fetch
- [x] SNI-rewrite tunnels (direct to Google edge, bypassing the relay) for `google.com`, `youtube.com`, `youtu.be`, `youtube-nocookie.com`, `fonts.googleapis.com`. Extra domains configurable via the `hosts` map.
- [x] Automatic redirect handling on the relay (`/exec` → `googleusercontent.com`)
- [x] Header filtering (strip connection-specific, brotli)
- [x] `test` and `scan-ips` subcommands
- [x] Script IDs masked in logs (`prefix…suffix`) so `info` logs don't leak deployment IDs
- [x] Desktop UI (egui) — cross-platform, no bundler needed
- [x] Optional upstream SOCKS5 chaining for non-HTTP traffic (Telegram MTProto, IMAP, SSH…) so raw-TCP flows can be tunneled through xray / v2ray / sing-box instead of connecting directly. HTTP/HTTPS keeps going through the Apps Script relay.
- [x] Connection pool pre-warm on startup (first request skips the TLS handshake to Google edge).
- [x] Per-connection SNI rotation across a pool of Google subdomains (`www/mail/drive/docs/calendar.google.com`), so outbound connection counts aren't concentrated on one SNI.
- [x] Optional parallel script-ID dispatch (`parallel_relay`): fan out a relay request to N script instances concurrently, return first success, kill p95 latency at the cost of N× quota.
- [x] Per-site stats drill-down in the UI (requests, cache hit %, bytes, avg latency per host) for live debugging.
- [x] Editable SNI rotation pool (UI window + `sni_hosts` config field) with per-name reachability probes (`mhrv-rs test-sni` CLI or **Test** / **Test all** / **Keep working only** buttons). DNS + TLS-handshake based, catches both DPI-blocked names and typos.
- [x] OpenWRT / Alpine / musl builds — static binaries, procd init script included.
Intentionally **not** implemented (rationale included so future contributors don't spend cycles on them):
- **HTTP/2 multiplexing** — the `h2` crate state machine (stream IDs, flow control, GOAWAY) has too many subtle hang cases; coalescing + 20-connection pool already gets most of the benefit for this workload.
- **Request batching (`q:[...]` mode)** — our connection pool + tokio async already parallelizes well; batching adds ~200 lines of state management with unclear incremental gain.
- **Range-based parallel download** — edge cases (non-Range servers, chunked mid-stream, content-encoding) are real; YouTube-style video already bypasses Apps Script via SNI-rewrite tunnel.
- **Other modes** (`domain_fronting`, `google_fronting`, `custom_domain`) — Cloudflare killed generic domain fronting in 2024; Cloud Run needs a paid plan. Skip unless specifically requested.
## Known limitations
These are inherent to the Apps Script + domain-fronting approach, not bugs in this client. The original Python version has the same issues.
- **User-Agent is fixed to `Google-Apps-Script`** for anything going through the relay. `UrlFetchApp.fetch()` does not allow overriding it. Consequence: sites that detect bots (e.g., Google search, some CAPTCHA flows) serve degraded / no-JS fallback pages to relayed requests. Workaround: add the affected domain to the `hosts` map so it's routed through the SNI-rewrite tunnel with your real browser's UA instead. `google.com`, `youtube.com`, `fonts.googleapis.com` are already there by default.
- **Video playback is slow and quota-limited** for anything that goes through the relay. YouTube HTML loads through the tunnel (fast), but chunks from `googlevideo.com` go through Apps Script. Each Apps Script consumer account has a ~2 M `UrlFetchApp` calls/day quota and a 50 MB body limit per fetch. Fine for text browsing, painful for 1080p. Rotate multiple `script_id`s for more headroom, or use a real VPN for video.
- **Brotli is stripped** from forwarded `Accept-Encoding` headers. Apps Script can decompress gzip, but not `br`, and forwarding `br` produces garbled responses. Minor size overhead.
- **WebSockets don't work** through the relay — it's single request/response JSON. Sites that upgrade to WS fail (ChatGPT streaming, Discord voice, etc.).
- **HSTS-preloaded / hard-pinned sites** will reject the MITM cert. Most sites are fine because the CA is trusted; a handful aren't.
- **Google / YouTube 2FA and sensitive logins** may trigger "unrecognized device" warnings because requests originate from Google's Apps Script IPs, not yours. Log in once via the tunnel (`google.com` is in the rewrite list) to avoid this.
## Security posture
- The MITM root stays **on your machine only**. The `ca/ca.key` private key is generated locally and never leaves the user-data dir.
- `auth_key` between the client and the Apps Script relay is a shared secret you pick. The server-side `Code.gs` rejects requests without a matching key.
- Traffic between your machine and Google's edge is standard TLS 1.3.
- What Google can see: the destination URL and headers of each request (because Apps Script fetches on your behalf). This is the same trust model as any hosted proxy — if that's not acceptable, use a self-hosted VPN instead.
- **IP exposure caveat (`apps_script` mode):** v1.2.9 strips every `X-Forwarded-For` / `X-Real-IP` / `Forwarded` / `Via` / `CF-Connecting-IP` / `True-Client-IP` / `Fastly-Client-IP` and ~10 related identity-revealing headers from your outbound request before it reaches Apps Script (issue #104). What this **does not** cover: whatever Google's own infrastructure may add when its Apps Script runtime makes the subsequent `UrlFetchApp.fetch()` to the target site. That second leg is server-side, outside this client's control — so the destination server sees a Google datacenter IP, but there is no public guarantee Google never propagates the original caller's IP in some internal header chain. If your threat model requires that the destination site cannot under any circumstances learn your IP, **use Full Tunnel mode** (traffic exits from your own VPS, only the VPS IP is exposed end-to-end). `apps_script` mode remains fine for bypassing DPI / reaching blocked sites where "seen by Google" is acceptable. Raised in [#148](https://github.com/therealaleph/MasterHttpRelayVPN-RUST/issues/148).
## License
MIT. See [LICENSE](LICENSE).
## Credit
Original project: by [@masterking32](https://github.com/masterking32). The idea, the Google Apps Script protocol, the proxy architecture, and the ongoing maintenance are all his. This Rust port exists purely to make client-side distribution easier.
## Support this project
If `mhrv-rs` has been useful to you and you'd like to support continued development:
### [❤️ Support on sh1n.org](https://sh1n.org/donate)
Donations cover hosting, self-hosted CI runner costs, and continued maintenance. Starring the repo also helps signal that the project is worth keeping alive.
---
## راهنمای فارسی
### این ابزار چیست؟
یک پروکسی کوچک که روی سیستم خودتان اجرا میشود و ترافیک شما را از طریق یک اسکریپت رایگان که در حساب گوگل خودتان میسازید، عبور میدهد. `ISP` شما فقط یک اتصال `HTTPS` ساده به `www.google.com` میبیند و اجازه میدهد رد شود؛ در پشت پرده، اسکریپتی که خودتان منتشر میکنید سایت مقصد را برای شما میخواند و پاسخ را بازمیگرداند.
این نسخهٔ `Rust` از پروژهٔ اصلی [MasterHttpRelayVPN](https://github.com/masterking32/MasterHttpRelayVPN) اثر [@masterking32](https://github.com/masterking32) است. **تمام اعتبار ایده و نسخهٔ اصلی پایتون برای ایشان است.** این پورت همان روش را در قالب یک فایل اجرایی تکپارچه (~۳ مگابایت) بدون نیاز به نصب پایتون یا هیچ وابستگی دیگری ارائه میدهد.
> **نکتهٔ مهم دربارهٔ نویسندگی:** بیشتر کدِ این پورت `Rust` با کمک [Claude](https://claude.com) شرکت Anthropic نوشته شده و روی هر commit توسط انسان بازبینی شده است. اگر باگی دیدید یا پیشنهادی دارید، لطفاً در [صفحهٔ issues](https://github.com/therealaleph/MasterHttpRelayVPN-RUST/issues) گزارش دهید.
### برای چه کسی مفید است؟
- کسانی که در شبکههای تحت سانسور قوی (مثل ایران) زندگی میکنند
- کسی که میخواهد بدون `VPN` تجاری، بدون نصب پایتون، و بدون پرداخت پول عبور کند
- کسی که حتی یک حساب گوگل رایگان دارد
### چه چیز لازم دارید؟
۱. یک حساب گوگل (همان `Gmail` رایگان کافیست)
۲. مرورگر (`Firefox`، `Chrome`، `Edge`، …) یا برنامهای که `HTTP proxy` یا `SOCKS5` قبول کند
۳. دسترسی به سیستم خودتان (مک / لینوکس / ویندوز)
### پنج مرحله برای راهاندازی
#### مرحلهٔ ۱ — ساخت اسکریپت در گوگل (فقط یک بار)
۱. به بروید و با حساب گوگل خودتان وارد شوید
۲. روی **`New project`** کلیک کنید و کد پیشفرض را پاک کنید
۳. محتوای فایل [`Code.gs`](https://github.com/masterking32/MasterHttpRelayVPN/blob/python_testing/apps_script/Code.gs) را از ریپوی اصلی کپی کنید و داخل ویرایشگر بچسبانید. اگر به آدرس بالا دسترسی ندارید، یک کپی از همین فایل داخل این ریپو هم هست: [`assets/apps_script/Code.gs`](assets/apps_script/Code.gs)
۴. بالای کد، خط `const AUTH_KEY = "..."` را پیدا کنید و مقدار آن را به یک رمز قوی و خاص خودتان تغییر دهید (یک رشتهٔ تصادفی حداقل ۱۶ کاراکتری کافی است، مثلاً `aK8f3xM9pQ2nL5vR`)
۵. روی دکمهٔ آبی **`Deploy`** در بالا سمت راست کلیک کنید و **`New deployment`** را بزنید
۶. **`Type`** را روی **`Web app`** بگذارید و این تنظیمات را اعمال کنید:
- **`Execute as`**: **`Me`**
- **`Who has access`**: **`Anyone`**
۷. روی **`Deploy`** کلیک کنید. گوگل یک **`Deployment ID`** نشان میدهد — رشتهٔ طولانی تصادفی که داخل آدرس `URL` است. کپیاش کنید؛ در برنامه لازم دارید
> **نکته:** اگر نمیدانید رمز `AUTH_KEY` چه بگذارید، یک رشتهٔ تصادفی ۱۶ تا ۲۴ کاراکتری بسازید. مهم فقط این است که **دقیقاً همان رشته** را در برنامه هم وارد کنید.
#### به `script.google.com` هم دسترسی ندارید؟
اگر `ISP` شما از قبل `Apps Script` (یا کل گوگل) را مسدود کرده، برای مرحلهٔ ۱ باید مرورگرتان **اول** به `script.google.com` برسد — قبل از اینکه رلهای داشته باشید. `mhrv-rs` یک حالت `direct` دقیقاً برای همین دارد — فقط تونل بازنویسی `SNI`، بدون نیاز به رلهٔ `Apps Script`. (قبل از v1.9 این حالت `google_only` نام داشت — نام قدیمی همچنان در فایل کانفیگ پذیرفته میشود.)
۱. برنامه را طبق مرحلهٔ ۲ پایین دانلود کنید
۲. فایل [`config.direct.example.json`](config.direct.example.json) را در کنار فایل اجرایی به نام `config.json` کپی کنید — نه `script_id` لازم دارد و نه `auth_key`
۳. برنامه را اجرا کنید و `HTTP proxy` مرورگرتان را روی `127.0.0.1:8085` تنظیم کنید
۴. در حالت `direct`، پروکسی فقط `*.google.com`، `*.youtube.com` و بقیهٔ میزبانهای لبهٔ گوگل (به علاوهٔ هر [`fronting_groups`](docs/fronting-groups.md) که تنظیم کرده باشید) را از طریق تونل بازنویسی `SNI` رد میکند. بقیهٔ ترافیک مستقیم میرود — هنوز رلهای در کار نیست
۵. حالا مرحلهٔ ۱ را در مرورگر انجام دهید (اتصال به `script.google.com` با `SNI` فرونت میشود). `Code.gs` را مستقر کنید و `Deployment ID` را کپی کنید
۶. در `UI` دسکتاپ یا اندروید (یا با ویرایش `config.json`) حالت را به `apps_script` برگردانید، `Deployment ID` و `auth_key` را بچسبانید و برنامه را دوباره راهاندازی کنید
برای بررسی قابلیت دسترسی قبل از راهاندازی پروکسی: دستور `mhrv-rs test-sni` دامنههای `*.google.com` را مستقیماً تست میکند و فقط به `google_ip` و `front_domain` نیاز دارد.
#### مرحلهٔ ۲ — دانلود برنامه
به [صفحهٔ Releases](https://github.com/therealaleph/MasterHttpRelayVPN-RUST/releases) بروید و آرشیو مناسب سیستمعامل خود را دانلود و از حالت فشرده خارج کنید:
| سیستمعامل | فایل مناسب |
|---|---|
| مک اپلسیلیکون (`M1` / `M2` / …) | `mhrv-rs-macos-arm64-app.zip` (قابل دوبار کلیک در `Finder`) |
| مک اینتل | `mhrv-rs-macos-amd64-app.zip` |
| ویندوز | `mhrv-rs-windows-amd64.zip` |
| لینوکس معمولی (اوبونتو، مینت، دبیان، فدورا، آرچ، …) | `mhrv-rs-linux-amd64.tar.gz` |
| لینوکس روی روتر (`OpenWRT`) یا `Alpine` | `mhrv-rs-linux-musl-amd64.tar.gz` |
> اگر نمیدانید مک شما `M1/M2` است یا اینتل: منوی اپل → `About This Mac` → در خط **`Chip`** اگر **`Apple`** نوشته شده، `arm64` بگیرید؛ اگر **`Intel`**، `amd64`.
> کاربران اوبونتو ۲۰.۰۴ یا سیستمهای خیلی قدیمی که خطای `GLIBC not found` میگیرند: آرشیو `linux-musl-amd64` را دانلود کنید — اجرا میشود.
#### مرحلهٔ ۳ — اجرای بار اول (نصب گواهی محلی)
برای اینکه برنامه بتواند ترافیک `HTTPS` مرورگر شما را باز کند و از طریق `Apps Script` رد کند، یک گواهی امنیتی کوچک **روی سیستم خودتان** میسازد و به سیستمعامل میگوید به آن اعتماد کند.
**کاری که باید بکنید (خودکار است):**
| سیستمعامل | روش |
|---|---|
| مک | روی `run.command` دو بار کلیک کنید |
| ویندوز | روی `run.bat` دو بار کلیک کنید |
| لینوکس | در ترمینال دستور `./run.sh` را اجرا کنید |
**فقط یک بار** رمز سیستم (`sudo` در مک/لینوکس یا `UAC` در ویندوز) میخواهد تا گواهی را نصب کند. بعد از آن برنامه باز میشود و در اجراهای بعدی میتوانید مستقیماً از فایل اصلی (`mhrv-rs.app` در مک، `mhrv-rs-ui.exe` در ویندوز) استفاده کنید.
**امنیت این گواهی:**
- گواهی **کاملاً روی سیستم شما** ساخته میشود. کلید خصوصی هیچوقت از کامپیوترتان خارج نمیشود
- هیچ سرور راه دوری — از جمله خود گوگل — نمیتواند با این گواهی خودش را جای سایتها جا بزند
- هر وقت خواستید میتوانید گواهی را حذف کنید (بخش **[حذف گواهی](#سوالات-رایج)** را ببینید)
> **اگر نمیخواهید از اسکریپت راهانداز استفاده کنید**، میتوانید مرحلهٔ گواهی را دستی انجام دهید:
>
> - مک/لینوکس: `sudo ./mhrv-rs --install-cert`
> - ویندوز (با `Run as administrator`): `mhrv-rs.exe --install-cert`
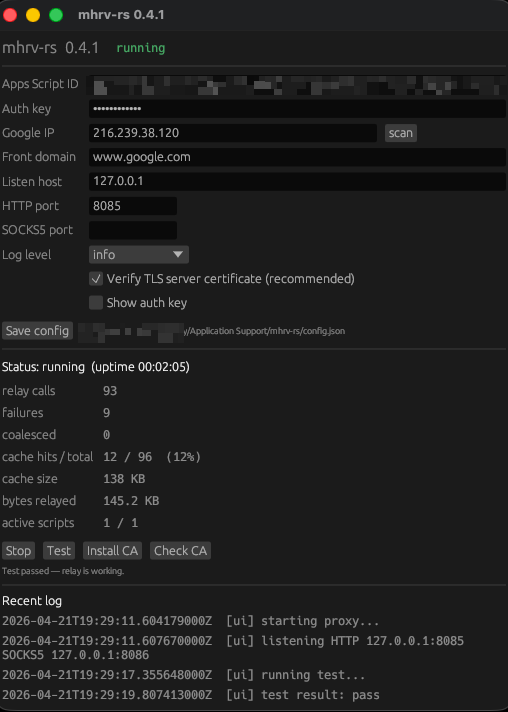
#### مرحلهٔ ۴ — تنظیمات در برنامه
پنجرهٔ برنامه باز میشود. این فیلدها را پر کنید:
| فیلد | مقدار |
|---|---|
| **`Apps Script ID(s)`** | همان `Deployment ID` مرحلهٔ ۱ را paste کنید |
| **`Auth key`** | همان رمز `AUTH_KEY` که داخل `Code.gs` گذاشتید |
| **`Google IP`** | پیشفرض `216.239.38.120` معمولاً خوب است. دکمهٔ `scan` کنارش IPهای دیگر گوگل را تست میکند و سریعترین را نشان میدهد |
| **`Front domain`** | پیشفرض `www.google.com` را نگه دارید |
| **`HTTP port`** / **`SOCKS5 port`** | پیشفرضهای `8085` و `8086` خوباند |
بعد روی **`Save config`** و سپس **`Start`** کلیک کنید. هر وقت خواستید وضعیت را تست کنید، دکمهٔ **`Test`** را بزنید — یک درخواست کامل میفرستد و نتیجه را نشان میدهد.
#### مرحلهٔ ۵ — تنظیم مرورگر یا اپلیکیشن
برنامه روی دو پورت منتظر است:
- **`HTTP proxy`** روی `127.0.0.1:8085` — برای مرورگرها
- **`SOCKS5 proxy`** روی `127.0.0.1:8086` — برای تلگرام / `xray` / بقیهٔ اپلیکیشنها
**فایرفاکس (سادهترین):**
#### پیکربندی scan-ips (اختیاری)
بهطور پیشفرض، دستور scan-ips از آرایهای ثابت از IPها استفاده میکند.
میتوانید کشف پویای IP را با تنظیم fetch_ips_from_api روی true در config.json فعال کنید:
```json
{
"fetch_ips_from_api": true,
"max_ips_to_scan": 100,
"scan_batch_size":100,
"google_ip_validation": true // برسی هدر های بازگشته از ایپی برای برسی هدر ها و تشخیص کاربردی بودن ایپی
}
```
زمانی که فعال باشد:
- فایل goog.json را از API محدودههای عمومی IP گوگل دریافت میکند
تمام CIDRها را استخراج کرده و به IPهای جداگانه تبدیل میکند
- به IPهای دامنههای معروف گوگل (google.com، youtube.com و غیره) اولویت میدهد
بهصورت تصادفی تا max_ips_to_scan کاندید انتخاب میکند (ابتدا IPهای اولویتدار)
فقط کاندیدهای انتخابشده را برای اتصال و اعتبارسنجی frontend تست میکند.
با استفاده از این گزینهها ممکن است IPهایی پیدا کنید که سریعتر از آرایه ثابت پیشفرض هستند اما تضمینی وجود ندارد که این IPها کار کنند.
#### ۵. تنظیم proxy در کلاینت
۱. منوی `Settings` را باز کنید، در خانهٔ جستوجو عبارت `proxy` را تایپ کنید
۲. روی **`Network Settings`** کلیک کنید
۳. گزینهٔ **`Manual proxy configuration`** را انتخاب کنید
۴. در فیلد **`HTTP Proxy`** آدرس `127.0.0.1` و پورت `8085` را بگذارید
۵. تیک **`Also use this proxy for HTTPS`** را بزنید
۶. `OK`
**کروم یا Edge:** از تنظیمات `proxy` سیستمعامل استفاده میکنند. سادهترین راه نصب افزونهٔ **`Proxy SwitchyOmega`** و تنظیم آن روی `127.0.0.1:8085` است.
**تلگرام:**
۱. `Settings` → `Advanced` → `Connection type`
۲. **`Use custom proxy`** → **`SOCKS5`**
۳. هاست `127.0.0.1`، پورت `8086`، نام کاربری و رمز را خالی بگذارید
۴. `Save` بزنید
> **نکتهٔ مهم دربارهٔ تلگرام:** اگر فقط این ابزار را استفاده کنید، تلگرام ممکن است مرتب قطع و وصل شود، چون `Apps Script` پروتکل `MTProto` تلگرام را نمیفهمد. برای پایداری کامل تلگرام، بخش [**تلگرام پایدار با xray**](#تلگرام-و-غیره--جفت-کردن-با-xray) را ببینید.
### از کجا بفهمم کار میکند؟
۱. در پنجرهٔ برنامه، وضعیت باید **`Status: running`** باشد (سبز رنگ)
۲. دکمهٔ **`Test`** را بزنید — اگر سبز شد، سرویس سالم است
۳. در مرورگر به بروید — `IP` نمایش دادهشده باید متفاوت از `IP` واقعی شما باشد (آیپی گوگل)
۴. اگر مشکلی بود، پنل **`Recent log`** پایین برنامه را نگاه کنید
### تلگرام و غیره — جفت کردن با xray
`Apps Script` فقط `HTTP` میفهمد، پس پروتکلهای دیگر (مثل `MTProto` تلگرام، `IMAP` ایمیل، `SSH`، …) مستقیماً از آن رد نمیشوند. نتیجه: اگر `ISP` تلگرام را با `DPI` بلاک کرده باشد، همچنان بلاک است.
**راهحل:** یک [`xray`](https://github.com/XTLS/Xray-core) (یا `v2ray` یا `sing-box`) روی سیستم خودتان اجرا کنید که با `VLESS` / `Trojan` / `Shadowsocks` به یک سرور `VPS` شخصی وصل میشود. بعد در برنامهٔ `mhrv-rs`، فیلد **`Upstream SOCKS5`** را با آدرس `xray` پر کنید (مثلاً `127.0.0.1:50529`).
بعد از این کار، ترافیکی که `HTTP` نیست (مثل تلگرام) از `xray` عبور میکند و به سرور شما میرسد. ترافیک `HTTP/HTTPS` مثل قبل از `Apps Script` میرود، پس مرورگر شما دست نخورده کار میکند.
```json
{
"upstream_socks5": "127.0.0.1:50529"
}
```
### ویرایشگر SNI pool
بهصورت پیشفرض برنامه بین چند نام گوگل میچرخد (`www.google.com`، `mail.google.com`، `drive.google.com`، `docs.google.com`، `calendar.google.com`) تا اثر انگشت ترافیک شما یکنواخت نباشد. اما بعضی از این نامها گاهی در شبکهٔ شما بلاک میشوند — مثلاً `mail.google.com` در ایران چند بار هدف قرار گرفته.
**برای بررسی و ویرایش:**
۱. روی دکمهٔ آبی **`SNI pool…`** در برنامه کلیک کنید
۲. دکمهٔ **`Test all`** را بزنید — هر نام را تست میکند و نتیجه را کنارش نشان میدهد (`ok` یا `fail`)
۳. دکمهٔ **`Keep working only`** را بزنید — همه نامهایی که پاسخ ندادند را غیرفعال میکند
۴. اگر نام جدیدی میخواهید اضافه کنید، در کادر پایین نام را بنویسید و **`+ Add`** بزنید — خودکار تست میشود
۵. با **`Save config`** در پنجرهٔ اصلی ذخیره کنید
### حالت تونل کامل (Full tunnel mode)
حالت `"mode": "full"` **تمام** ترافیک را سرتاسر از طریق `Apps Script` و یک [tunnel-node](tunnel-node/) روی سرور شما عبور میدهد — **بدون نیاز به نصب گواهی `MITM`**. تنها هزینهاش تأخیر بیشتر است (هر بایت از مسیر `Apps Script → tunnel-node → مقصد` میرود)، اما برای هر پروتکل و هر برنامه بدون نصب `CA` کار میکند.
**سریعترین راه راهاندازی `tunnel-node` روی `VPS`:** ایمیج آمادهٔ `Docker`:
```bash
docker run -d --name mhrv-tunnel --restart unless-stopped \
-p 8080:8080 -e TUNNEL_AUTH_KEY=رمز_قوی_شما \
ghcr.io/therealaleph/mhrv-tunnel-node:latest
```
`multi-arch` (هم `linux/amd64` و هم `linux/arm64`)، اجرا با کاربر غیر `root`، حدود ۳۲ مگابایت فشرده. برای محیط production نسخهٔ مشخص (`:1.5.0`) را pin کنید. راهنمای کامل (شامل `Cloud Run`، `docker-compose`، و بیلد از سورس) در [`tunnel-node/README.md`](tunnel-node/README.md) هست.
#### چرا تعداد `Deployment ID` مهم است؟
هر درخواست دستهای (`batch`) به `Apps Script` حدود ۲ ثانیه طول میکشد. در حالت `full`، برنامه یک **لولهٔ موازی** (`pipeline`) اجرا میکند که چند درخواست دستهای را همزمان میفرستد بدون اینکه منتظر پاسخ قبلی بماند. هر `Deployment ID` (= یک حساب گوگل) حوضچهٔ همزمانی مخصوص خودش با **۳۰ درخواست همزمان** دارد — مطابق سقف اجرای همزمان `Apps Script` به ازای هر حساب.
```
حداکثر همزمانی = ۳۰ × تعداد Deployment IDها
```
| تعداد Deployment | درخواستهای همزمان | |
|-----------------|-------------------|---|
| ۱ | ۳۰ | یک حساب — برای مرور سبک کافیست |
| ۳ | ۹۰ | مناسب استفادهٔ روزانه |
| ۶ | ۱۸۰ | توصیهشده برای استفادهٔ سنگین |
| ۱۲ | ۳۶۰ | چند حساب — حداکثر توان |
بیشتر `Deployment` = بیشتر همزمانی = تأخیر کمتر برای هر نشست. هر دسته بین `ID`ها چرخش میکند (`round-robin`)، پس بار بهطور یکنواخت توزیع میشود.
### اجرا روی OpenWRT (روتر)
اگر میخواهید برنامه را روی روترتان اجرا کنید تا همهٔ دستگاههای شبکه از آن استفاده کنند، آرشیو `mhrv-rs-linux-musl-*.tar.gz` را دانلود کنید (این نسخه فایل اجرایی استاتیک دارد و بدون نصب هیچ وابستگی روی روتر کار میکند).
```sh
# از کامپیوتری که به روترتان دسترسی دارد:
scp mhrv-rs root@192.168.1.1:/usr/bin/mhrv-rs
scp mhrv-rs.init root@192.168.1.1:/etc/init.d/mhrv-rs
scp config.json root@192.168.1.1:/etc/mhrv-rs/config.json
# روی خود روتر (ssh کنید به روتر):
chmod +x /usr/bin/mhrv-rs /etc/init.d/mhrv-rs
/etc/init.d/mhrv-rs enable
/etc/init.d/mhrv-rs start
logread -e mhrv-rs -f
```
در فایل `config.json`، مقدار `listen_host` را به `0.0.0.0` تغییر دهید تا روتر از همهٔ دستگاههای `LAN` اتصال بپذیرد. بعد در هر دستگاه، `HTTP proxy` را روی آیپی روتر پورت `8085` (یا `SOCKS5` روی `8086`) تنظیم کنید.
مصرف حافظه حدود ۱۵ تا ۲۰ مگابایت است — روی هر روتری با حداقل ۱۲۸ مگابایت `RAM` اجرا میشود.
### اجرا روی اندروید
یک نسخهٔ اندروید هم داریم — همان `mhrv-rs` ولی داخل یک برنامهٔ `Compose` با پل `TUN` از طریق [`tun2proxy`](https://crates.io/crates/tun2proxy). تمام ترافیک دستگاه (مرورگر، تلگرام، هر برنامهای) خودکار از پروکسی رد میشود، بدون نیاز به تنظیم per-app.
**دانلود:** `mhrv-rs-android-universal-v*.apk` از [صفحهٔ Releases](https://github.com/therealaleph/MasterHttpRelayVPN-RUST/releases/latest) (یک APK جهانی، روی اندروید ۷.۰ و بالاتر، همهٔ معماریها).
**راهنمای کامل فارسی:** [**`docs/android.fa.md`**](docs/android.fa.md) — نصب APK، دیپلوی `Apps Script`، تست `SNI`، نصب گواهی `MITM`، رفع اشکال و محدودیتها.
راهنمای انگلیسی هم در [`docs/android.md`](docs/android.md) است.
جمعبندی سریع:
۱. APK را از `Releases` دانلود و نصب کنید (اگر اندروید «منبع ناشناس» گفت، در همان دیالوگ اجازه بدهید)
۲. `Apps Script` را طبق [مرحلهٔ ۱ بالا](#مرحلهٔ-۱--ساخت-اسکریپت-در-گوگل-فقط-یک-بار) دیپلوی کنید (همان `Code.gs` + `AUTH_KEY`)
۳. `/exec URL` و `auth_key` را در برنامه وارد کنید، **Auto-detect google_ip** را بزنید
۴. **Install MITM certificate** — برنامه گواهی را در `Downloads` ذخیره میکند و `Settings` را باز میکند. در `Settings` عبارت `CA certificate` را جستوجو و از `Downloads` نصب کنید
۵. **Start** → مجوز `VPN` را تأیید کنید → همهچیز کار میکند
محدودیتهای اندروید همان محدودیتهای دسکتاپ + دو مورد اضافه: `IPv6` از `TUN` رد نمیشود (فقط `IPv4` روت میشود) و اکثر برنامههای غیر مرورگری (بانکی، `Netflix`، پیامرسانها) به `CA` کاربری اعتماد نمیکنند. جزئیات در [`docs/android.fa.md`](docs/android.fa.md#محدودیتهای-شناختهشده).
### سوالات رایج
**چرا باید گواهی نصب کنم؟ امن است؟**
برنامه برای اینکه بتواند ترافیک `HTTPS` شما را باز کند و از طریق `Apps Script` رد کند، به یک گواهی محلی نیاز دارد. این گواهی **فقط روی سیستم خودتان** ساخته میشود و کلید خصوصی هیچوقت جایی ارسال نمیشود. هیچ کس — حتی خود گوگل — نمیتواند با این گواهی به ترافیک شما دسترسی پیدا کند.
**چطور گواهی را بعداً حذف کنم؟**
- **سادهترین راه (هر سه سیستمعامل):** داخل برنامه روی دکمهٔ **`Remove CA`** بزنید، یا در ترمینال:
- مک/لینوکس: `sudo ./mhrv-rs --remove-cert`
- ویندوز (با `Run as administrator`): `mhrv-rs.exe --remove-cert`
- این دستور گواهی را از `trust store` سیستم و `NSS` (فایرفاکس/کروم) پاک میکند و فایلهای `ca/ca.crt` و `ca/ca.key` را هم روی دیسک حذف میکند. فایل `config.json` و `deployment` آپساسکریپت دستنخورده میمانند — پس لازم نیست `Code.gs` را دوباره دیپلوی کنید.
- **بهصورت دستی** (اگر میخواهید):
- **نکته:** نام گواهی (`Common Name`) در همهٔ مکانها `MasterHttpRelayVPN` است — `mhrv-rs` نام برنامه است، نه نام گواهی.
- **مک:** `Keychain Access` را باز کنید، در بخش `System` دنبال `MasterHttpRelayVPN` بگردید و حذف کنید. سپس پوشهٔ `~/Library/Application Support/mhrv-rs/ca/` را پاک کنید
- **ویندوز:** `certmgr.msc` را اجرا کنید → `Trusted Root Certification Authorities` → `Certificates` → دنبال `MasterHttpRelayVPN` بگردید و حذف کنید
- **لینوکس:** فایل `/usr/local/share/ca-certificates/MasterHttpRelayVPN.crt` را حذف و `sudo update-ca-certificates` اجرا کنید
**چند `Deployment ID` لازم دارم؟**
یکی برای استفادهٔ عادی کافی است. سهمیهٔ روزانه `UrlFetchApp` برای حساب رایگان گوگل **۲۰٬۰۰۰ درخواست در روز** است (برای `Workspace` پولی ۱۰۰٬۰۰۰)، با محدودیت پاسخ ۵۰ مگابایت به ازای هر `fetch`. از هر حساب گوگل **فقط یک `Deployment`** بسازید — سقف ۳۰ درخواست همزمان به ازای هر حساب است، پس چند `Deployment` روی یک حساب همزمانی اضافه نمیکند. برای افزایش همزمانی یا سهمیهٔ روزانه، در حسابهای گوگل دیگر `Deployment` بسازید — هر حساب سهمیهٔ ۲۰ هزار درخواستی و ۳۰ اجرای همزمان خودش را دارد. همهٔ `ID`ها را در فیلد `Apps Script ID(s)` وارد کنید — برنامه خودکار بینشان میچرخد. مرجع:
**یوتوب کار میکند؟ ویدیو پخش میشود؟**
صفحهٔ یوتوب سریع باز میشود (چون مستقیم از لبهٔ گوگل میآید). اما `chunk`های ویدیوی اصلی از `googlevideo.com` از طریق `Apps Script` میآیند و روزانه سهمیه دارند. برای تماشای گاهبهگاه خوب است، برای ۱۰۸۰p پخش طولانی دردناک.
**`ChatGPT` یا `OpenAI` کار میکنند؟**
استریم زنده (`streaming`) آنها کار نمیکند چون از `WebSocket` استفاده میکنند و `Apps Script` آن را پشتیبانی نمیکند. تنها راهحل: از `xray` استفاده کنید (بخش **تلگرام و غیره** را ببینید).
**خطای `GLIBC_2.39 not found` در لینوکس میگیرم. چه کنم؟**
از نسخهٔ `v0.7.1` به بعد این مشکل حل شده. اما اگر روی سیستم خیلی قدیمی هستید، آرشیو `mhrv-rs-linux-musl-amd64.tar.gz` را دانلود کنید — این نسخه بدون نیاز به `glibc` روی هر لینوکسی اجرا میشود.
**میتوانم با `CLI` هم استفاده کنم (بدون رابط گرافیکی)؟**
بله. فایل `config.example.json` را به `config.json` کپی کنید، مقادیر را پر کنید، و این دستورات را بزنید:
```bash
./mhrv-rs # اجرای پروکسی
./mhrv-rs test # تست یک درخواست کامل
./mhrv-rs scan-ips # رتبهبندی IPهای گوگل بر اساس سرعت
./mhrv-rs test-sni # تست نامهای SNI در pool
./mhrv-rs --install-cert # نصب مجدد گواهی
./mhrv-rs --remove-cert # حذف کامل گواهی: پاکسازی trust store و کل پوشهٔ ca/
./mhrv-rs --help
```
دستور `--remove-cert` گواهی را از `trust store` سیستم پاک میکند، با بررسی نام تأیید میکند که حذف انجام شده، و سپس پوشهٔ `ca/` روی دیسک را حذف میکند — اگر حذف نیاز به دسترسی ادمین داشته باشد که در دسترس نبوده، قبل از پاک کردن فایلها متوقف میشود تا بتوانید با دسترسی مدیر دوباره اجرا کنید. پاکسازی `NSS` (فایرفاکس/کروم) `best-effort` است: اگر `certutil` نصب نباشد یا یکی از مرورگرها بازِ دیتابیس را قفل کرده باشد، ابزار پیغامی با راهنمای پاکسازی دستی نشان میدهد. فایل `config.json` شما و `deployment` آپساسکریپت در `script.google.com` دستنخورده میمانند — یعنی وقتی در اجرای بعدی گواهی تازه تولید میشود، نیازی به دیپلوی مجدد `Code.gs` نیست.
**چرا گاهی جستوجوی گوگل بدون `JavaScript` نشان داده میشود؟**
`Apps Script` مجبور است `User-Agent` درخواستهای خود را روی `Google-Apps-Script` بگذارد. بعضی سایتها این را به عنوان ربات شناسایی میکنند و نسخهٔ سادهٔ بدون `JavaScript` برمیگردانند. دامنههایی که در لیست `SNI-rewrite` قرار گرفتهاند (مثل `google.com`، `youtube.com`) از این مشکل در امان هستند چون مستقیماً از لبهٔ گوگل میآیند، نه از `Apps Script`.
**ورود به حساب گوگل با این ابزار ایمن است؟**
توصیه میشود اولین بار بدون این پروکسی یا با `VPN` واقعی وارد شوید، چون گوگل ممکن است `IP` `Apps Script` را بهعنوان «دستگاه ناشناس» ببیند و هشدار بدهد. بعد از ورود اولیه، استفاده بیمشکل است.
### محدودیتهای شناختهشده
این محدودیتها ذاتی روش `Apps Script` هستند، نه باگ این برنامه. نسخهٔ اصلی پایتون هم دقیقاً همین محدودیتها را دارد.
- `User-Agent` همهٔ درخواستها ثابت روی `Google-Apps-Script` است (گوگل اجازهٔ تغییر نمیدهد). بعضی سایتها بهخاطر این نسخهٔ سادهشدهٔ بدون `JavaScript` نشان میدهند
- پخش ویدیو سهمیه دارد و ممکن است کند باشد (سهمیهٔ `UrlFetchApp` برای حساب رایگان ۲۰٬۰۰۰ درخواست در روز است — چند ساعت یوتیوب برای بیشتر کاربران)
- فشردهسازی `Brotli` پشتیبانی نمیشود (فقط `gzip`)، سربار حجمی جزئی
- `WebSocket` از `Apps Script` عبور نمیکند (`ChatGPT` استریم، `Discord voice`، …)
- سایتهایی که گواهی خود را `pin` کردهاند گواهی `MITM` برنامه را قبول نمیکنند (تعداد کمیاند)
- ورود دومرحلهای گوگل ممکن است هشدار «دستگاه ناشناس» بدهد — اولین ورود را بدون این ابزار انجام دهید
### امنیت
- ریشهٔ `MITM` **فقط روی سیستم شما میماند**. کلید خصوصی هیچوقت از سیستمتان خارج نمیشود
- `auth_key` یک رمز اختصاصی بین شما و اسکریپت شماست. کد سرور هر درخواستی را که این رمز را نداشته باشد رد میکند
- ترافیک بین شما و گوگل، `TLS 1.3` استاندارد است
- آنچه گوگل میبیند: آدرس `URL` و هدرهای درخواست شما (چون `Apps Script` بهجای شما `fetch` میکند). این همان سطح اعتماد هر پروکسی میزبانیشده است — اگر قابل قبول نیست، از `VPN` روی سرور شخصی خودتان استفاده کنید
- **هشدار افشای `IP` در حالت `apps_script`:** نسخهٔ ۱.۲.۹ همهٔ هدرهای شناساییکننده (`X-Forwarded-For`، `X-Real-IP`، `Forwarded`، `Via`، `CF-Connecting-IP`، `True-Client-IP`، `Fastly-Client-IP` و ~۱۰ هدر مشابه) را از درخواست خروجی سمت کلاینت قبل از رسیدن به `Apps Script` حذف میکند ([#104](https://github.com/therealaleph/MasterHttpRelayVPN-RUST/issues/104)). اما آنچه این پوشش نمیدهد: هر هدری که زیرساخت خود گوگل ممکن است به درخواست بعدی `UrlFetchApp.fetch()` از کلاینت اضافه کند، در اختیار این برنامه نیست. سرور مقصد `IP` دیتاسنتر گوگل را میبیند، اما هیچ تعهد عمومی از گوگل وجود ندارد که `IP` واقعی کاربر در زنجیرهٔ هدرهای داخلی منتشر نمیشود. اگر مدل تهدید شما این است که سرور مقصد تحت هیچ شرایطی نباید `IP` شما را ببیند، **از حالت `full` (تونل کامل) استفاده کنید** (ترافیک از `VPS` شخصی شما خارج میشود، فقط `IP` آن `VPS` دیده میشود). حالت `apps_script` برای دور زدن `DPI` و دسترسی به سایتهای فیلترشده کاملاً مناسب است، اما فرض میکند «دیدهشدن توسط گوگل» قابل قبول است. مطرحشده در [#148](https://github.com/therealaleph/MasterHttpRelayVPN-RUST/issues/148).
### اعتبار
پروژهٔ اصلی: توسط [@masterking32](https://github.com/masterking32). ایده، پروتکل `Apps Script`، و معماری پروکسی همه متعلق به ایشان است. این پورت `Rust` فقط برای سادهتر کردن توزیع سمت کلاینت درست شده.
### حمایت از پروژه
اگر `mhrv-rs` برای شما مفید بوده و میخواهید از ادامهٔ توسعه حمایت کنید:
### [❤️ حمایت در sh1n.org](https://sh1n.org/donate)
کمکها صرف هزینههای میزبانی، سرور `CI` اختصاصی، و ادامهٔ نگهداری پروژه میشود. ستاره دادن به ریپو هم یک راه رایگان برای نشان دادن اینه که پروژه ارزش ادامه دادن داره.